Items Needed:
Straw wreath or Styrofoam wreath ring ( The size of the wreath is up to you. I used a straw wreath about 12" in diameter)
1 bundle of yarn (Bulkier yarn works best but I used "I Love This Yarn" in light peach)
Scissors
Felt squares in various colors
Hot glue gun or clear craft glue
Ribbon
Various findings (I used pearl beads for flower centers)
(You can find all of these supplies at Hobby Lobby)
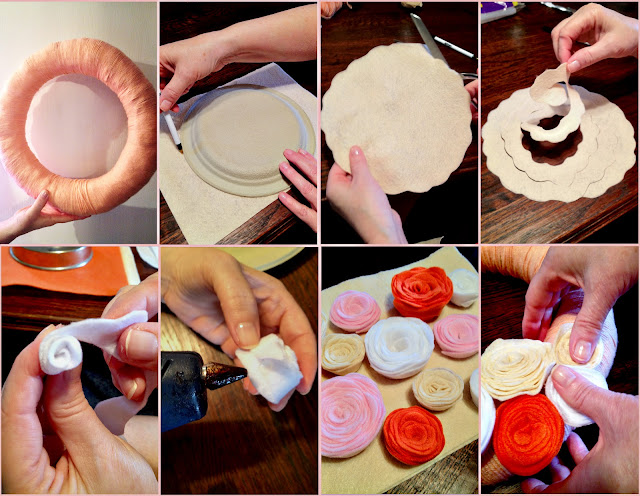
Wrapping the wreath:
1. Wrap yarn one time around the wreath and tie a tight knot. Keep the knot to the back side and continue to tightly wrap your wreath with yarn. (If you are using a straw wreath, keep the plastic wrap on. This help keeps the wreath smooth and doesn't make a mess. Also, do not take the wrapper off of the yarn or else you will end up with a tangled mess.)
2. When you have finished wrapping your wreath, tie off the yarn and, again, keep the knot to the back side of the wreath.
Making the rosettes:
1. Take one of your felt squares and trace a circle. You can make one large rosette or several small rosettes.
2. Cut around the traced circle in a wavy pattern and continue cutting the circle in a spiral.
3. Begin with the inside of the spiral and begin to wrap the felt in a circle. (The tighter you wrap, the more closed the rosette will be. The looser you wrap, the more open your rosette will be.)
4. Secure the end of the spiral with a dot of hot glue or clear craft glue.
5. For the pearl centers, add a drop of glue in the center and lightly press the pearl bead in the center.
Finishing Touch:
1. Arrange your rosettes on the wreath and then secure with a hot glue gun or clear craft glue.
2. Tie a pretty ribbon around the top and hang for all to see :)
|


3 Comments:
awesome! love the yarn wreath and can't wait to try another :) great blog!
Thank you Rachel! We appreciate your support!
Um are you KIDDING ME with the cuteness?!?! Your eye for color is seriously unreal
Post a Comment
Subscribe to Post Comments [Atom]
<< Home