Friday, May 9, 2014

New Website

minnetonka mocs
Hey guys, do you hear those crickets? Oh, that would be me going AWOL. Oops. No, I actually haven't been absent, I've been building a new, self-hosted website! You can have a sneak peek here at my temporary domain address. A lot of the pages are still blank, but...I'm slowly migrating the content over to the new space. I will be reverting this blog back to isntthatsew.blogspot.com, but I will be leaving this site live and linking to it on the new Isn't that Sew website! 

I'm really excited about the move to a self-hosted website. I was feeling a little boxed in over here on blogger. Some of the options just weren't available (or easily available) for me to grow this space. On my new site, I'll be positioned for future growth, read a built in shop and member log-in area! I also plan to refocus my content. I feel like God is urging me to share the talent he has given me in a more profound way. So, I'm going to do just that! 
Isn't that Sew

The site will look fairly similar, but..it'll have a new color scheme and a few differences in function and layout. Overall, it will be a cleaner, more focused space! 

If you are not already on a self-hosted website, do you have any apprehension about moving to a new site?


Labels:

Sunday, April 27, 2014

Leather and Denim Tote Bag


Happy Monday y'all! It's been two weeks since posting about the 10 simple steps to make a coin purse. Remember how I told you about K & C Supplies, well here is part II of our collaboration! Have you visited K & C Supplies Etsy shop yet? If not, you should! I used three zippers from the shop for these projects and I couldn't be happier with how this pair turned out!

How about this tote bag! WOAH! It took me a bit of time to construct this baby! I'll be honest, it took me longer than I expected to sew this up! With that said, I will be breaking up the tutorial parts of this bag into a few different posts. I'd like to create simpler, more detailed posts about making certain features of the bag. For example, the recessed zipper, or bag lining with a zipper pocket, and maybe even a few tips on how to sew denim and leather! What do you think? 

Is it more helpful to break complicated projects into mini-series posts?

This post is sponsored by K &C Supplies. All zippers c/o K &C Supplies. Use code SEW10 promo code to get 10% OFF your order, valid through May 1, 2014.

Labels: , ,

Friday, April 25, 2014

Pattern-Making Basics | How to take Body Measurements

This post has been updated and re-written on my new website, HERE

When you want the freedom to sew your own clothing, it is so important that you know your accurate body measurements. Inevitably, whether you want to know or not...you will need to determine your size. You'll start with an existing pattern or garment and intimately knowing your bodies shape and size makes all the difference when it comes to having the freedom to make design, fit, and style adjustments. Accurate measurements are essential to making sure your finished pieces fit you perfectly!

Are you ready to take your home sewing to the next level?!

How to take your Body Measurements + FREE PRINTABLE measurement guide | www.isntthatsew.com

Tips
  • Have someone else take your body measurements. This will ensure the measurements are accurate. Trust me...contorting your body to get the measurement does not yield accurate results! 
  • Wear next to nothing, or maybe just your underwear. This will give you true measurements.
  • Use a flexible tape measure, like this one from Dritz. And measure loosely, meaning do not pull the tape so tight that your clothing would be uncomfortable. 
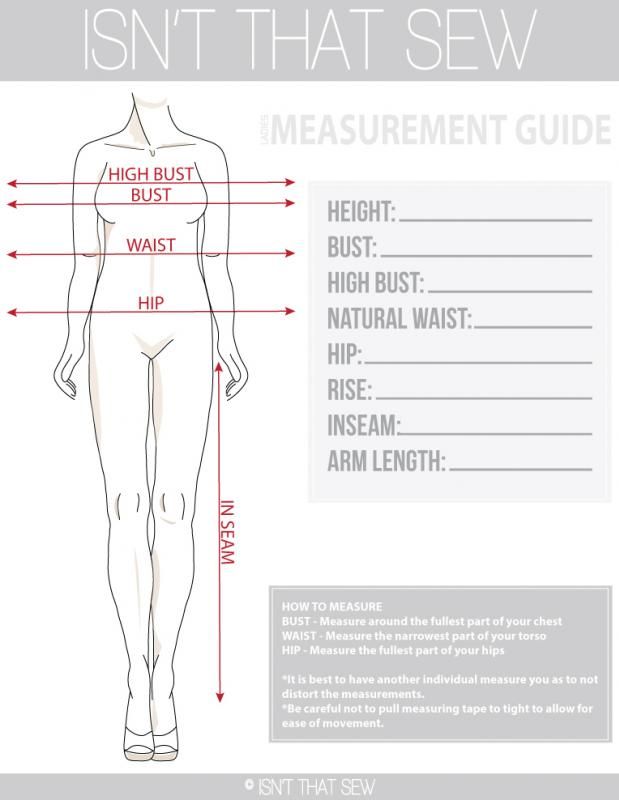
  • Print the free Isn't that Sew Measurement Guide to keep track of your body measurements.

How to take Body Measurements
Height: Stand with your feet slightly apart and your back against a wall. Have a helper measure from the floor to the tip top of your head.

Bust: Relax your arms at your sides, measure the fullest part of your bust, keeping the tape parallel to the floor.

High Bust: Again, relax your arms at your side and measure just above your breasts.

Waist: Measure loosely around your natural waist. Your natural waist will be between your belly button and your rib cage.

Hips: Measure the fullest part of your hips and back side, making sure to keep the tape level. Again, make sure to measure loosely.

Rise: Holding the tape at the center back of your natural waist. Run the tape between your legs, pulling comfortably at the crotch, and up to your natural waist in front. 

Inseam: Measure from your crotch to the bottom of your ankle. You can also measure the inseam of your best fitting pant to get your inseam measurement.

Arm: Bend your elbow 90 degrees and place your hand on your hip. Hold the tape at the center back of your neck. Measure across your shoulder to your elbow, and down to your wrist. The total length in inches is your sleeve length.


If you found this post helpful, please SHARE, COMMENT, or PIN it! 


Labels: , , , ,

Monday, April 21, 2014

Sewing Basics | The Basic Tools and Supplies

Sewing for beginners | Tools and Supplies | www.isntthatsew.com
Sewing Basics-Tools and Supplies

Cutting
You'll need several types of scissors when setting up your home sewing studio. You need scissors that specialize in different tasks. Yes, even scissors can be highly specialized. The basic scissors you'll need to get started are fabric scissors and paper scissors. The nice to have scissors are embroidery scissors and a rotary cutter. 
Sewing Basics | Tools and Supplies | www.isntthatsew.com

Fabric Scissors / Dressmaker's Shears: 8” bent dressmaker’s shears are by far the best tool for cutting fabric. It is super important to only use them to cut fabric. Also, it's best to keep them sharp. Most sewing machine dealers will sharpen scissors and I think even some local fabric shops can take care of business. My favorite dressmaker's shears are Gingher 8" Knife Edge Dressmaker Shears.
Paper Scissors: Any old scissor will get the job done. You will use these scissors to cut paper and tissue paper patterns, but never fabric. Something like this pair of scissors will do just fine. 
Embroidery Scissors:These guys are optional, but hand to have around. They come in handy trimming threads, clipping corners, or opening button holes. Same as the dressmakering shears, I am a loyal Gingher customer and wouldn't recommend anything else. The one's I have in my studio are these 4" embroidery scissors. But, these 4.5" thread nippers are pretty awesome too! They just don't serve much of a dual function.
Rotary Cutters: Oh joy! What a time saver this handy tool can be. It works great for cutting just about anything, except of course really intricate curves and corners. I love Fiskars Roatry tools. It is best to use a ruler for straight lines and you will definitely need a cutting mat! You can purchase a set of rotary tools to save a few bucks.
Seam ripper:s I am including this in the cutting section because I don't know where else to put it. A seam ripper is a small, pointed device with a super sharp blade. It is used to pick unwanted stitches (read you really messed up). Or, to open seams and/or button holes. I think it's best to spend a few extra bucks and get an ergonomical seam ripper from Dritz. Your hand will thank you after you have to pull apart your first seam! 
Sewing Basics | Tools and Supplies | www.isntthatsew.com

Measuring
I cannot stress how important measuring is when sewing. Sometimes an eighth of an inch makes all the difference. Seriously, I speak from first hand experience! The good news is that you don't need a bunch of expensive or fancy rules, like you do when pattern drafting
Sewing Basics | Tools and Supplies | www.isntthatsew.com

Tape Measure: I think the plain ole' plastic coated tape measures work the best. They won't stretch and they have proven themselves tried and true over the years. You'll use this to obtain body measurements, or to measure round curves.  Most tape measures are yellow and are 60" long by 5/8" wide. Dritz makes my favorite tape measure
Seam Gauge: This handy tool isn't a deal breaker, but it's nice to have. It works well when measuring and marking button holes and hems. It's a 6” ruler w/ a adjustable slide that moves up and down. How cool is that. I can't tell you how many times I've used a seam gauge in my day! 
Clear plastic: This guy is great for home décor, measuring just about anything, and cutting straight lines (with rotary cutter).

Marking
Marking your patterns and fabric is also important. When putting a garment together, it involves a lot of steps and specific orders of operation. So, keeping everything marked and in order will come in handy!
Sewing Basics | Tools and Supplies | www.isntthatsew.com

Disappearing chalk: This chalk will disappear on its own after a few days or with the heat of an iron. 
Wash-out pencil: This marking pencil is best sued for dark colors. It will wash out w/ a drop of water.
Vanishing Marker: This marker is best for light colors. I like it better than a pencil because it is a felt-tipped marker. I also prefer the one that has two sides, the 'disappearing ink' and 'marks be gone'. One side disappears in 12-24 hours and other side will wash out.
Tailors chalk, rotary: Tailors chalk is another one of those ole' tried and true dressmaker's tools. You can get a neat chalk holder to go with it so you don't get your hands all chalky. I am also a big fan of the rotary chalk pencils. They are filled with a powdered chalk and have a wheel that dispenses the chalk nicely. I love this rotary chalk pencil from Clover.

Ironing
Ironing. Again, just like everything else...it's oh so crucial! It really makes all the difference when trying to create professional looking garments.

Ironing board: Umm...self explanatory, no? You can get a smaller table top version or a traditional free standing ironing board. Make sure it's padded though. If it not padded  you can scar your seam and/or fabric. Not good. I like the covers that are cotton or muslin because they aren't as slipper or keep as much heat as the reflective covers. 
Iron: You’ll need a good Iron. Like, seriously. A good iron is crucial. I prefer Rowenta. Which ever brand you choose, it will need a variety of heat settings so that you can adjust per fabric requirements. 
Press cloth: While not a necessity, it's nice to have a press cloth. Press cloths act as barrier between iron and fabric. Make sure to use a 100% cotton or linen tea towel or just purchase a press cloth.
Seam roll: This is a funny little, sausage shaped fabric cylinder. It's about 12” long by 3” wide and it isgenerally used to press open seams. 
Tailors ham: Yes, that is its actual name, ham. It is a stuffed, triangular, ham shaped pressing tool that has several curves that simulate body shape. It helps to press and shape curved seams like darts, side seams, sleeves, etc. 


If you found this post helpful, please SHARE, COMMENT, or PIN it! 

Labels: , , ,

Wednesday, April 16, 2014

Places and Spaces | Tonto National Forest

Tonto National Forest | www.isntthatsew.com
Hey guys! I just love taking photographs while Arizona road trippin' What I don't like so much is the post processing! I recently shared a little bit about our off road experience at Bulldog Canyon and I shared heaps of photos on Instagram. Like this one of, like 60 Himalayan salt lamps. What!?! But, today...here are a few fun shots of my in-laws back yard in the Tonto National Forrest. Enjoy! -Ruth-
Kokopelli | www.isntthatsew.com

Prickly pear cactus | www.isntthatsew.com

Barrel Cactus | www.isntthatsew.com

Barrel Cactus | www.isntthatsew.com

Labels: , ,

<data:blog.pageTitle/>

This Page

has moved to a new address:

http://isntthatsew.org

Sorry for the inconvenience…

Redirection provided by Blogger to WordPress Migration Service